PREPARING PRINT-READY FILES
Print-ready files are digital artwork files that are 100% ready to print, fulfilling several important criteria and requiring no further adjustments.
As with most printers, we at Percetakan Delima have a basic checklist of requirements for a print-ready file. Providing us with print-ready files will save us both time, money and frustration allowing us to print your design and artwork without any problems.
Have a look through to learn the basics of the printing process and understand how best to create your graphic files for print.
If you want to cut to the chase, click HERE to see the Print-Ready Basic Checklist
FORMATS
We accept artwork files that have been designed using either PC or MAC computers.
We prefer high-resolution Adobe Acrobat PDF files. PDF files are the best because they are universal portable document files (PDF) that work on most computers and printing platforms.
However we also accept the following file formats: Adobe Illustrator Version CS4 or higher (AI or EPS) Adobe InDesign Version CS4 or higher (INDD) Adobe Photoshop Version CS4 or higher (PSD or TIFF) JPEG images (300 dpi resolution with CMYK colour mode)
DIMENSIONS
Design your files in its intended finished size. This will help give the best estimation of how your printed file will look like. Also do remember to allow for 3mm bleed area and make sure to place all important details within the safe area which is another 3mm inside the trim line.
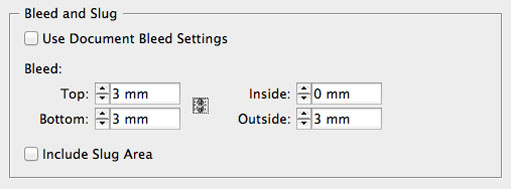
Bleed setup in InDesign. "Inside" should be left 0 for multiple-pages document. For single-sheet files bleed is set 3-5mm all round.
RESOLUTION
All artwork files must be at least 300dpi (dots per inch) or higher at the final output size. If you design a job at 72dpi, the design will result in blurry and pixelated prints.
COLOURS
Design all artwork in CMYK colour. RGB colour mode is meant for web/screen design only and if you use RGB, colours will dull once printed.
If you intend to use black (K) colour in your design, there are couple points to note. Plain black (K 100%) is best used for small text. If rich black or 4-colour build black is used for small text in your design, the text will become blurry and unreadable.
Use rich black for larger areas in your design piece instead. To create designs with a dark, rich black just add in some more colour into the mix. Here are some examples of rich black you could use in your designs.
| Rich black | C30, M30, Y20, K100 | Overall rich black. |
|---|---|---|
| Cool black | C60, M0, Y0, K100 | Black with a bluish tone. |
| Warm black | C0, M60, Y30, K100 | Black with a reddish tone. |
FONTS
Create outlines and embed all fonts and text for your final print file. We may not have the fonts that you used in your artwork and our computer software makes automatic substitutions which usually ends in undesirable results. Creating outlines for your fonts and text will prevent you from editing the text any further but will allows us to print your artwork as is.
IMAGES
Make sure the images you use in your artwork are of 300dpi resolution. Images taken straight from the web are not suitable as they are usually only 72dpi and will come out blurry and pixelated. Resizing a 72dpi image to 300dpi will not work as the images will still come out fuzzy. Using good quality, high-resolution images from the start will give you the best print results.
If you plan to buy stock images from photography websites, choose 300dpi and a reasonable print size in accordance with your design.
Lastly, remember to convert all images from other colour modes to CMYK or Grayscale (for black/white printing only). You can use Adobe Photoshop to do this ands this will allow you a better gauge of the image's colour so you can adjust accordingly.
MULTIPLE PAGES
Documents that are of single page or single sheet are quite straightforward but sometimes your documents may contain multiple pages meant to be bound together. When that is the case, you would have to remember that the total number of pages in bound documents (booklets, catalogues, etc.) must be divisible by 4 while loose-leaf documents (wire-o bind notebooks, corner-stapled leaflets etc.) must be divisible by 2.
Documents with multiple pages should be saved as individual pages within one file. Please do not save files in 'spreads' format as this will make it difficult for us to process the pages for printing bound documents.
The pages of the document must be submitted in order, including covers and any blank pages so that the total page count is complete from front to back.
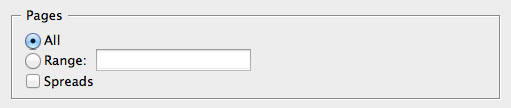
Paging setup in InDesign. Ensure that spreads are unchecked for your multiple pages documents upon saving.
OTHERS
Did you proofread your text? Use the spell checker, read through and get someone else to check for you again. Check that phone numbers and all contact details correct. It may seem simple and obvious but we can’t stress enough how important this is.
We do charge for re-prints, so it is entirely your responsibility that all information in your design is correct.
If you are submitting artwork for a two-sided job, send us two separate files. For example: ABC_front.pdf and ABC_back.pdf
There are of course many more points to consider. If you wanted to get down to the technical nitty and gritty, it will take a whole lot more than just one article! But if you follow through with all the details mentioned here, your file will be well-prepared for print allowing both you and your printer to save costs and time.
Print-ready Basic Checklist
- File is in proper format (PDF, AI, EPS, INDD, PSD, high-res JPG, TIFF)
- Includes all linked graphics, images, and text elements for native design files (AI, EPS, INDD, PSD).
- Create outlines and embed all fonts and text
- Contains only high resolution images in CMYK/grayscale colour
- Check colour profile (CMYK)
- Ensure correct usage of black (K) colour for text and solid areas
- Check if final artwork has enough resolution (minimum 300dpi at 100% size including bleeds)
- Check if all pages have enough bleed (3-5mm)
- Includes final size with indications for bleeds and page marking
- Includes trim/crop marks and page info
- Saved multiple pages document without spreads
- Proofread all information and final design
- Does not need any more changes before printing
Download printable pdf version of this checklist here.
![]()